Using Desktop VisualizeR with SiMi Folder

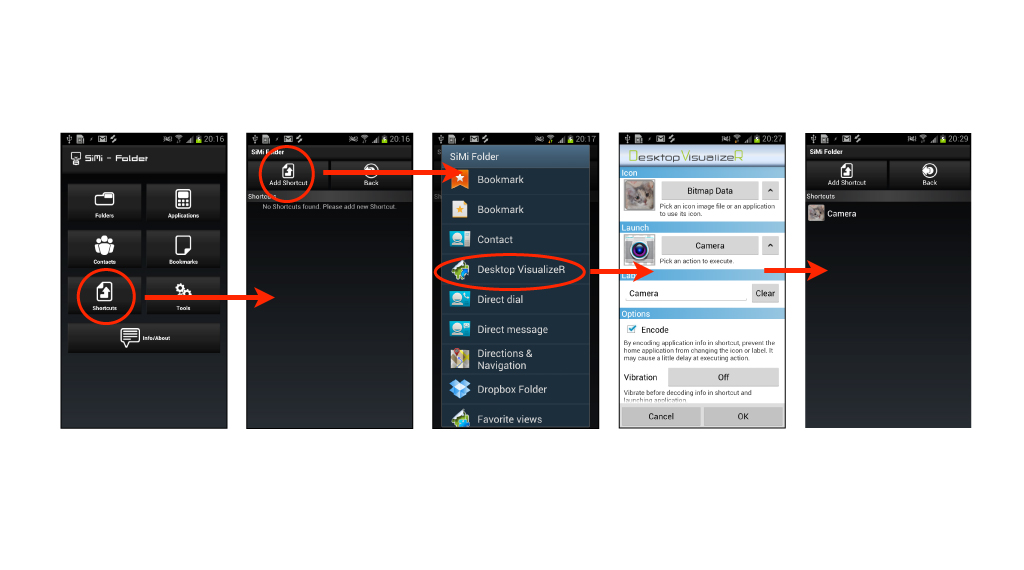
Create shortcut within SiMi Folder

Home launcher uses built-in icon for folders. It is because that Desktop VisualizeR cannot change folder icons. We introduce using SiMi Folder with Desktop VisualizeR to fully customize your folder like shortcuts or widgets. First of all, download SiMi Folder Widget from Google Play Store and launch it and tap “Shortcuts” > “Add Shortcut” then select “Desktop VisualizeR”. Desktop VisualizeR will be launched and you can configure icon and action.

SiMi01

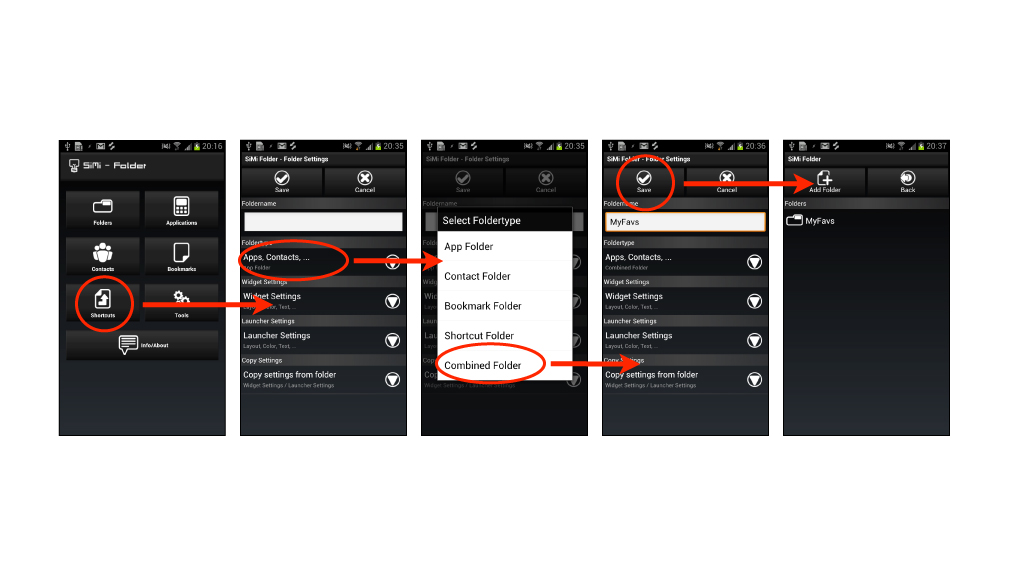
Add folder in SiMi Folder

Now you can create a folder that contains shortcut which you created.
Tap “Folders” > “Add Folder” and input folder name and tap “Folder type” selection. You should select “Shortcut Folder” or “Combined Folder” as its folder type. Select “Combined Folder” in this example and input folder name, then tap “Save”.
SiMi02

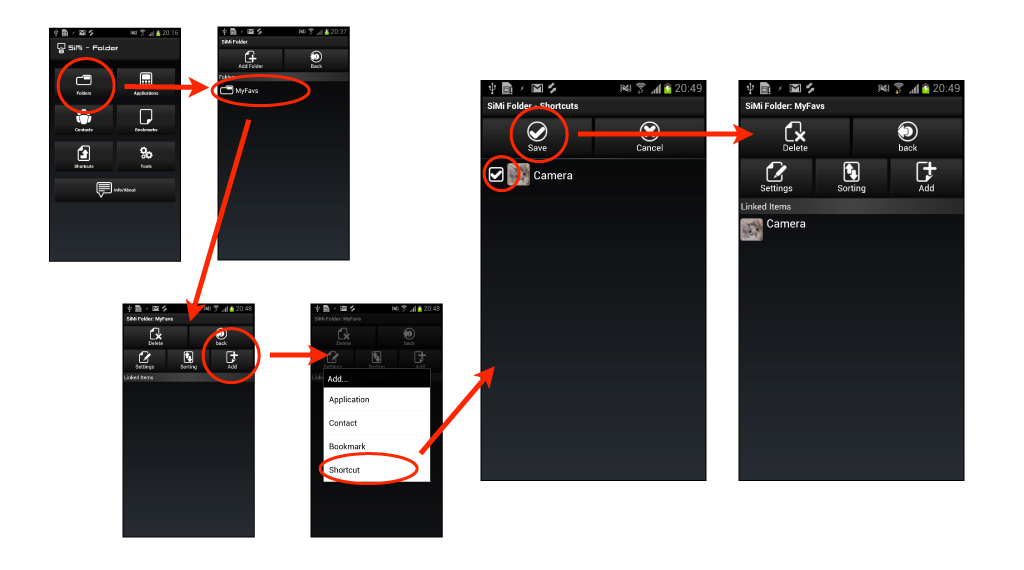
Add shortcut in folder

Now you can select the folder that created. At first folder has no contents in it. You should add shortcut to the folder. From the top of SiMi Folder, tap “Folders” > the folder you created > “Add” > “Shortcut” and check ON the shortcut that you created then tap “Save”.

SiMi03

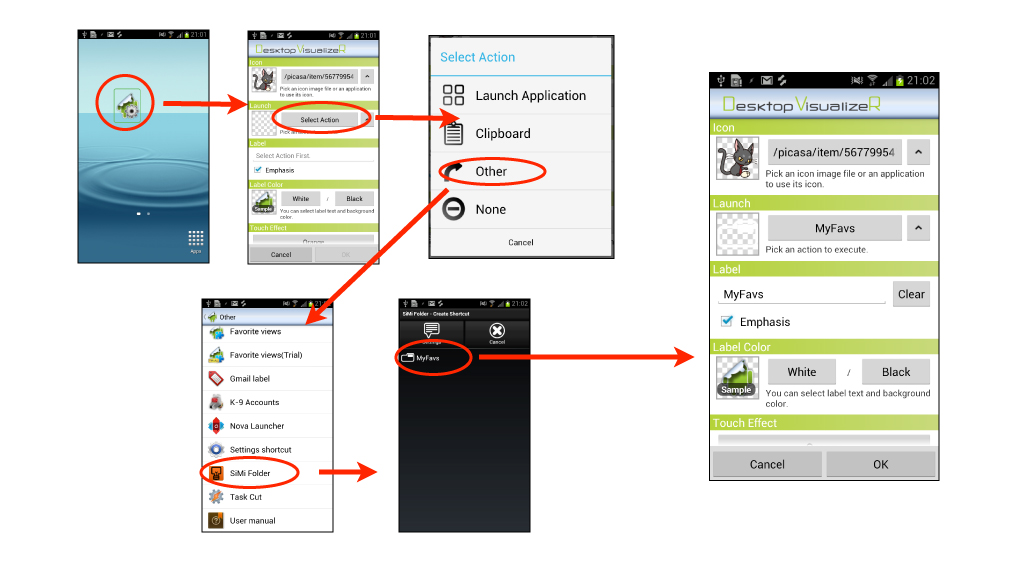
Set SiMi Folder as widget action

Now put Desktop VisualizeR widget and tap it to configure. Tap “Select Action” button and select “Other” > “SiMi Folder” and select the folder you created.

SiMi04

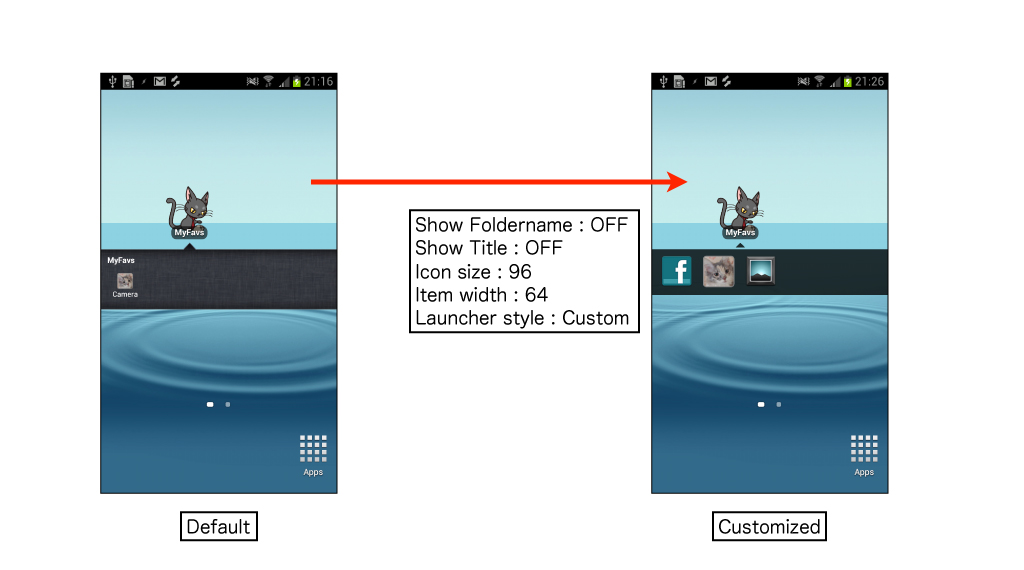
Customize folder appearance

You may not be satisfied by SiMi Folder default appearance. You can change appearance by launching SiMi Folder and select folder and “Settings”.

SiMi05

Desktop VisualizRとSiMi Folderを組合せて使用する

SiMi Folder内にショートカットを作成する

ホームアプリはフォルダに組込みのアイコンを使用しています。これがDesktop VisualizeRがフォルダのアイコンを変更できない理由です。この記事ではSiMi Folder と Desktop VisualizeR を組合せてフォルダと同等な機能をもつアイコンを作成する方法を紹介します。最初にGoogle PlayストアからSiMi Folder Widgetをダウンロードして、起動します。次に、“Shortcuts” > “Add Shortcut”を選択して、一覧から“Desktop VisualizeR”を選んでください。Desktop VisualizeRが起動されますので、アイコンやアクションを設定してください。

SiMi01

SiMi Folderにフォルダを作成する

次に今作成したショートカット用のフォルダをSiMi Folder内に作成します。
“Folders” > “Add Folder” の順にタップして、フォルダの名前を入力し、“Folder type”をタップします。ここで、“Shortcut Folder” または “Combined Folder” を選択してください。この例では “Combined Folder” を選択し、名前は example としています。全て指定したら “Save” をタップします。これでフォルダが作成できました。
SiMi02

ショートカットをフォルダに追加する

作成したフォルダには最初は何もありません。フォルダに最初の手順で作成したショートカットを追加します。SiMi Folderの最初の画面から、“Folders” > (作成したフォルダ) > “Add” > “Shortcut” の順にタップし、最初の手順で作成したショートカットのチェックボックスをON(チェックマークがついている状態)にして “Save” をタップします。

SiMi03

SiMi Folderをウィジェットのアクションに指定する

次に Desktop VisualizeR のウィジェットを設置後、タップして設定画面を開いてください。“アクション” ボタンをタップして “その他” > “SiMi Folder” > (作成したフォルダ) の順にタップします。これでアクションの設定は完了しました。

SiMi04

フォルダの外観をカスタマイズする

ひょっとしたらSiMi Folderのデフォルトの外観に満足できないかもしれません。そのような場合には、SiMi Folder を起動してフォルダを選択して “Settings” から外観をカスタマイズできます。

SiMi05

ADW EXでDVRImageSlicer用の設定を行う

ADWの設定を行う

DVRImageSlicerを使用する前にADW EXの設定を行う必要があります。
まず、“Auto Stretch”オプションをオンにすることを強く推奨します。このオプションがオフのままだとウィジェット間に隙間ができる場合があります。
このオプションをオンにするには、ADWSettingsから、“System” > “Advanced settings” > “Auto Stretch”を選択してチェックします。

同様に、ホーム画面の向きを“Portrait”に固定することを推奨します。
同様にADWSettingsから、“System” > “Advanced settings” > “Home Orientation” を選択し、“Portrait”を選びます。

ConfigSlicerAdw01

DVRSizeConfigウィジェットを設置する

次に、DVRSizeConfigToolを別途ダウンロードしウィジェットを設置します。以下のように4つ設置することをオススメします。ひとつはホーム画面の左上に(1), 次にホーム画面の右下に(2)、残りは左上に設置したウィジェットの直下(3)と右(4)に設置します。このように設置することでホーム画面でウィジェット間に隙間があるかを簡単に判別することができるようになります。
ウィジェットを設置するには、ホーム画面を長押しし、“Add” > “Widgets”を選択します。次に一覧の中から“DVRSizeConfigTool”を選択します。“Create widget and allow access?”のメッセージが表示された場合、“Always…”をチェックして、“Create”を選択します。

ConfigSlicerAdw02

Resize screensを行う

次に、ADW Configから、“Resize screens”を選択して設置したウィジェットが隙間なく配置されるように画面のアウトラインをドラッグして調節します。
ウィジェットサイズの計算の誤差によりウィジェット間に若干の隙間が生じる場合があります。このような隙間が内容に幅や高さを調節してください。

ConfigSlicerAdw03

DVRSizeConfigツールを起動する(1)

次に、左上(1)に設置したDVRSizeConfigウィジェットをタップします。”ウィジェット位置”に”左上”を指定し、ホーム画面グリッドにホーム画面のグリッド数を指定してOKボタンをタップします。DVRSizeConfigツールはここで指定した内容を一時的に保存します。

ConfigSlicerAdw04

DVRSizeConfigツールを起動する(2)

次に、右下(2)に設置したウィジェットをタップします。今度はウィジェット位置に”右下”を選択してOKボタンをタップします。グリッド数は一時的に保存された内容がデフォルトで表示されています。

ConfigSlicerAdw05

DVRSizeConfigツールを起動する(3)

左上および右下の設定が行われると、 DVRSizeConfigはその結果を Desktop VisualizeR に通知してそれまでDVRSizeConfigツールで保存していた設定情報を削除します。Desktop VisualizeR は送信された情報にもとづき結果を画面表示します。問題が発見されなかった場合には、“ウィジェットのサイズ設定が完了しました”という内容が表示されます(1)。もし、“ウィジェット間に隙間あり”という表示がされている場合(2)、“Resize screensを行う”の手順からやり直してください。

ConfigSlicerAdw06

エラーが発生した場合

場合によっては、OKボタンをタップした際に以下のようなエラー画面が表示されるかもしれません。これは、 DVRSizeConfigが正しくウィジェットのサイズを計測できなかった場合に発生します。例えば、同じウィジェット位置で左上と右下の設定を行うとこのような表示がされるはずです。このエラーが表示された場合には、ウィジェット位置で「設定済」と表示されている箇所から再度やり直してください。

ConfigSlicerAdw07


Configuring DVRImageSlicer with ADW Launcher EX

Configuring ADW

Before using DVRImageSlicer, you should configure ADW Ex property first.
We highly recommend enabling “Auto Stretch” option. With disabling this option, you’ll see gaps between widgets.
To enabling this option, select “System” > “Advanced settings” > “Auto Stretch”.

Also, we highly recommend fixing home orientation to “Portrait”.
To setting fixed orientation, select “System” > “Advanced settings” > “Home Orientation” > “Portrait”.

ConfigSlicerAdw01

Putting DVRSizeConfig widgets

Next, put 4 DVRSizeConfig widgets.  One is at left-top(1), one is at bottom-right(2) and the others are at directly under(3) and right(4) of the left-top. You can confirm gaps between widgets easily.
To put widget, long press your homescreen, then select “Add” > “Widgets” in the appeared “ADW Config” dialog and select “DVRSizeConfigTool”. If you see “Create widget and allow access?” dialog, check “Always…” and tap “Create”.

ConfigSlicerAdw02

Resize screens

Next, select “Resize screens” from ADW Config and drag the outline to perfectly fit the widgets.
You may see gaps between widgets. It’s because of rounding error of widget size. When you see these gaps, stretch or shorten the screen size.

ConfigSlicerAdw03

Run DVRSizeConfig(1)

Next, tap the left-top (1) widget to run DVRSizeConfig. Set “Top-Left” to widget location, homescreen grid and tap OK.

ConfigSlicerAdw04

Run DVRSizeConfig(2)

Next, tap the bottom-right (2) widget to run DVRSizeConfig. Set “Bottom-Right” to widget location and tap OK.

ConfigSlicerAdw05

Run DVRSizeConfig(3)

When you complete both Top-Left and Bottom-Right, DVRSizeConfig sends these size information to Desktop VisualizeR and delete its configuration. Desktop VisualizeR shows the result. When no problem has been found, it shows “Widget size configuration done.” dialog(1). If it shows “Gaps between widgets”(2), please go back to “Resize screens” and try again.

ConfigSlicerAdw06

Trouble shoot running DVRSizeConfig

You may see “Invalid setting” dialog when you tap OK. It is shown when DVRSizeConfig cannot determine widget size. For example, when you configure Top-Left and Bottom-Right with the same location, DVRSizeConfig cannot determine widget size. If you counter this result, you should reconfigure already completed location again.

ConfigSlicerAdw07