SDカードにインストールしたいのですが? | It was not possible to install to SD card Desktop VIsualizeR.

Desktop VisualizeR は、SDカードへのインストールは行えません。ウィジェットを含むアプリケーションはSDカードへインストールしないよう推奨されているためです。


Desktop VisualizeR does not allow installation to SD card. Application that contains the widget is because it is recommended that you do not install to the SD card.

Nova Launcher にショートカットが作成できない | Can not create a shortcut with Nova Launcher

Nova Launcer の最新バージョンのホーム画面にDesktop VisuazlieR からショートカットが作成できない場合があります。
この場合、ホーム画面からショートカットを追加する方法により、作成することができます。

方法については、ホームアプリからのショートカットの作り方 を参考にして下さい。


You may shortcut can not be created from Desktop VisuazlieR to the home screen of the latest version of the Nova Launcer.
In this case, by a method of adding a shortcut from the Home screen, you can create shortcut.

please refer to Create shortcuts from launcher .

Create shortcuts from launcher

■ Stock Launcher(Android 4.0 or later)

  1. Open the application drawer.
  2. Select “WIDGETS” tab and long press “Desktop VisualizeR”(light blue arrow).
  3. Drag the Desktop VisualizeR icon and drop.

stock_sc01

■ Nova Launcher

  1. Long press the empty space in your home screen.
  2. Select “Shortcuts” in the “Add to Home screen” dialog.
  3. Select “Desktop VisualizeR” in the “Choose shortcut” dialog.

Nova_en

■ ADW Launcher(EX)

  1. Long press the empty space in your home screen.
  2. Select “Add” tab and tap “Shortcuts” in the “Adw Config” menu.
  3. Select “Desktop VisualizeR” in the “Select shortcut” dialog.

Adw-sc

■ GO Launcher EX

  1. Long press the empty space in your home screen.
  2. Swipe icons and tap “Shortcut” in the “Add” menu.
  3. Select “Desktop VisualizeR” in the “Select shortcut” dialog.

go_sc


Resizing widget and configuring image quality

Desktop VisualizeR 1.4.1 now supports resizable widgets. Each type of widget, however, has different amount of memory usage limit. This fact sometimes lower widget image quality. You can configure the memory usage limit on each widget.

  1. Put a widget and resize it.
  2. Tap widget to launch widget configuring activity.
  3. Select “Settings” in the menu and set “Override memory assign” ON.
  4. Set “Memory assign” ON and enlarge the number. Smaller number uses less memory but may lower image quality.
  5. Configure the memory assign to keep lower number. It is useful entering edit mode before configuring.

resizeable03

Ex) Image quality difference(Left:small assign)

resizeable02

Using clipboard sample

Send mail directly

Copy mail address text into the clipboard and launch Desktop VisualizeR and tap “Set Action” > “Clipboard”. Applications for sending mail will be listed. Please select application to use. If you want to default application, select “[Default app]”. If the default application is not set, you’ll see completion dialog when you launch.
For example, please choose someone in your Contacts (or People) app, long press Email address, then select “Copy to clipboard”. And launch Desktop VisualizeR and tap “Select Action” > “Clipboard”.
clip01

Call or send SMS directly

You can set action that calling or sending SMS directly with the same way. The difference is copying not mail address but phone number.
clip02

Browse web site directly

You can also create shortcut to browse web page. For example, if you are using Dolphin Browser, long press address bar and select “Copy url” before launching Desktop VisualizeR.
clip03

端末起動時にウィジェットの画像が表示されません(砂時計のまま) | When the terminal starts, widgets images will not be displayed. (Hourglass icon)

端末起動時には複数の重要なアプリが起動することが考えられるため、DVRはウィジェット表示時にシステム負荷が理由で処理が中断されるとその後のリトライを行わない場合があります。おそれいりますが、手動でメニューからウィジェット更新を行ってください。


When the terminal start-up, application of multiple important is started.
Therefore, in order for the system becomes heavy, DVR will not retry processing.
Please update widget from the menu manually.

Using Desktop VisualizeR with SiMi Folder

Create shortcut within SiMi Folder

Home launcher uses built-in icon for folders. It is because that Desktop VisualizeR cannot change folder icons. We introduce using SiMi Folder with Desktop VisualizeR to fully customize your folder like shortcuts or widgets. First of all, download SiMi Folder Widget from Google Play Store and launch it and tap “Shortcuts” > “Add Shortcut” then select “Desktop VisualizeR”. Desktop VisualizeR will be launched and you can configure icon and action.

SiMi01

Add folder in SiMi Folder

Now you can create a folder that contains shortcut which you created.
Tap “Folders” > “Add Folder” and input folder name and tap “Folder type” selection. You should select “Shortcut Folder” or “Combined Folder” as its folder type. Select “Combined Folder” in this example and input folder name, then tap “Save”.
SiMi02

Add shortcut in folder

Now you can select the folder that created. At first folder has no contents in it. You should add shortcut to the folder. From the top of SiMi Folder, tap “Folders” > the folder you created > “Add” > “Shortcut” and check ON the shortcut that you created then tap “Save”.

SiMi03

Set SiMi Folder as widget action

Now put Desktop VisualizeR widget and tap it to configure. Tap “Select Action” button and select “Other” > “SiMi Folder” and select the folder you created.

SiMi04

Customize folder appearance

You may not be satisfied by SiMi Folder default appearance. You can change appearance by launching SiMi Folder and select folder and “Settings”.

SiMi05

Configuring DVRImageSlicer with ADW Launcher EX

Configuring ADW

Before using DVRImageSlicer, you should configure ADW Ex property first.
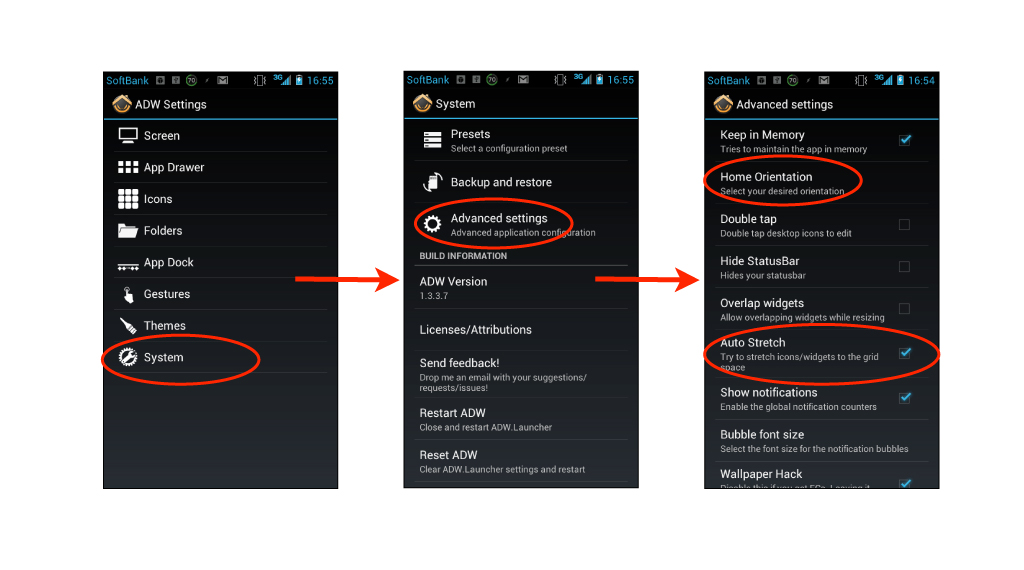
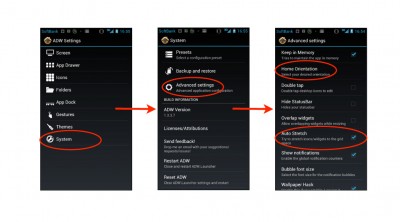
We highly recommend enabling “Auto Stretch” option. With disabling this option, you’ll see gaps between widgets.
To enabling this option, select “System” > “Advanced settings” > “Auto Stretch”.

Also, we highly recommend fixing home orientation to “Portrait”.
To setting fixed orientation, select “System” > “Advanced settings” > “Home Orientation” > “Portrait”.

ConfigSlicerAdw01

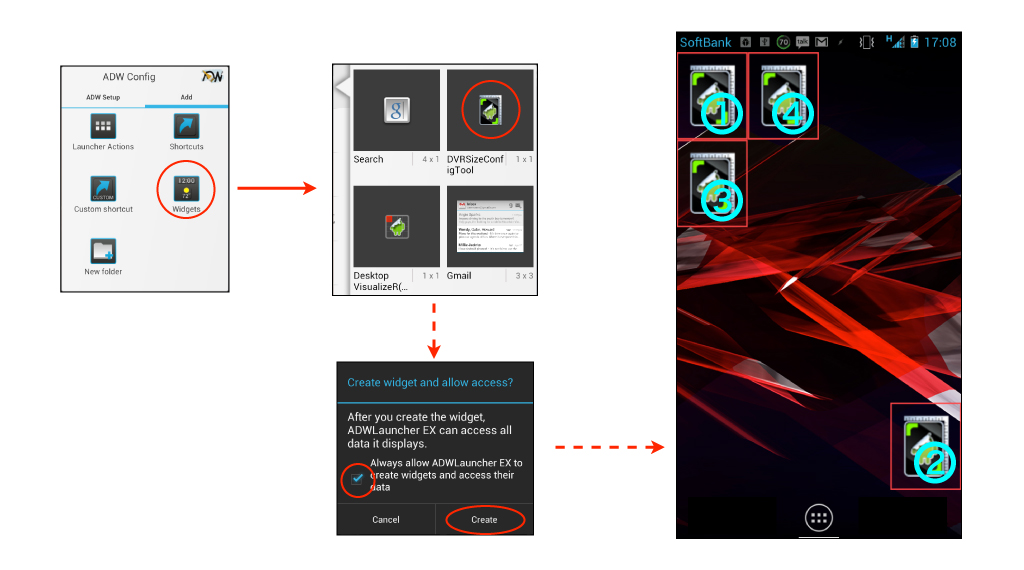
Putting DVRSizeConfig widgets

Next, put 4 DVRSizeConfig widgets.  One is at left-top(1), one is at bottom-right(2) and the others are at directly under(3) and right(4) of the left-top. You can confirm gaps between widgets easily.
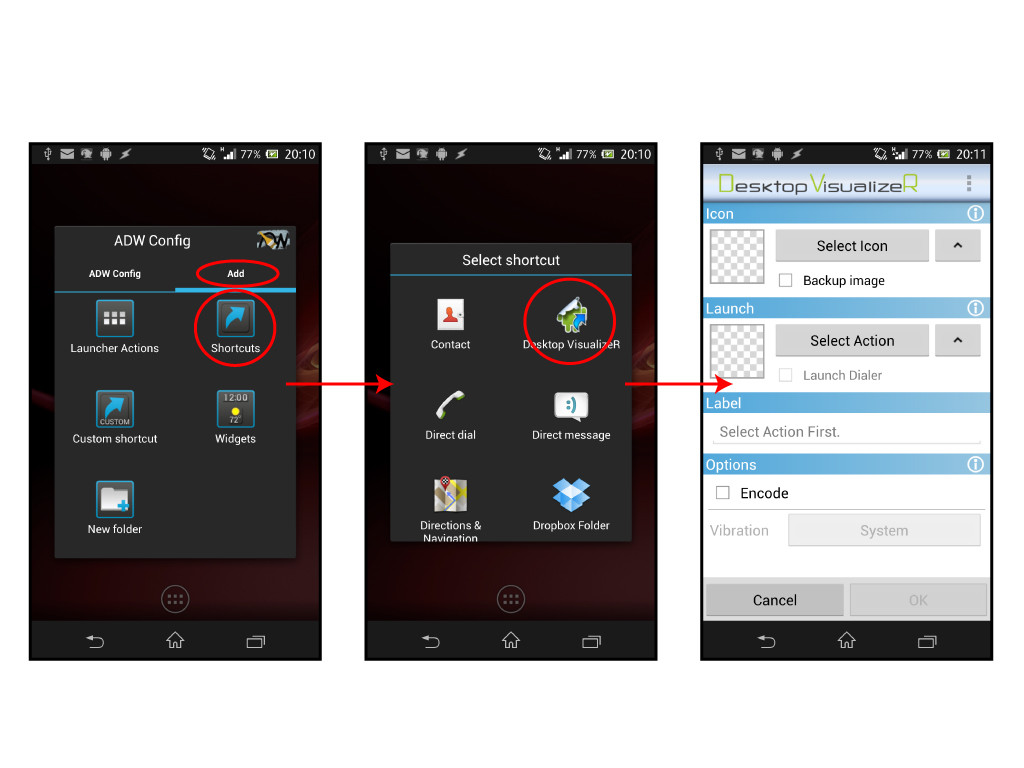
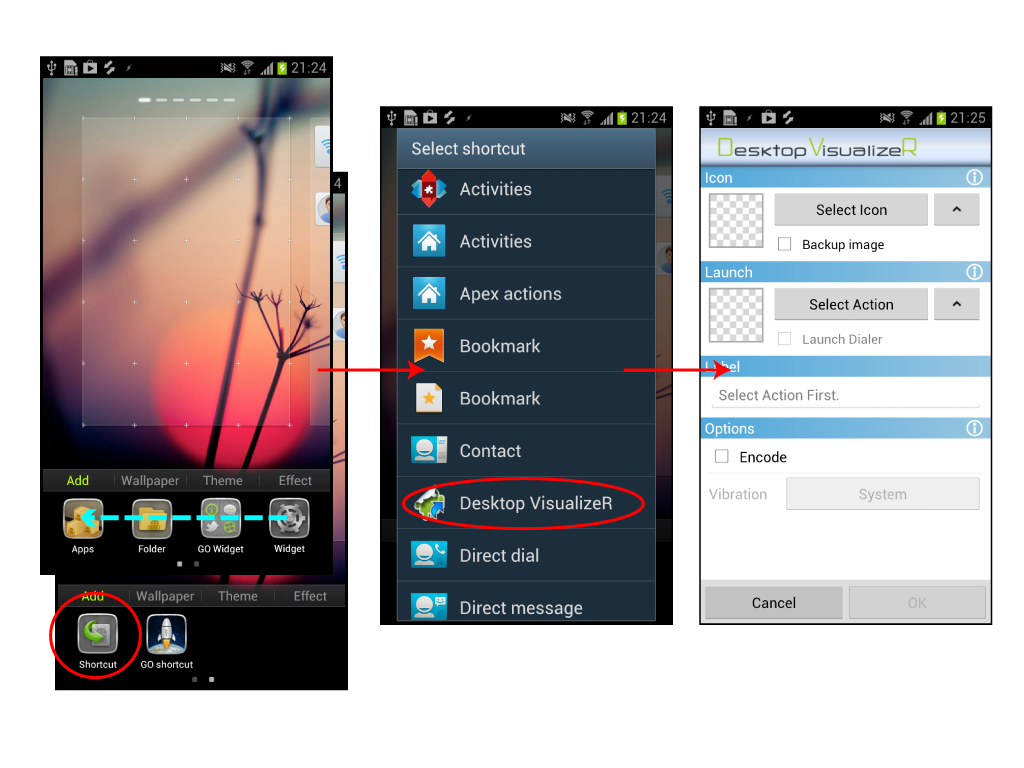
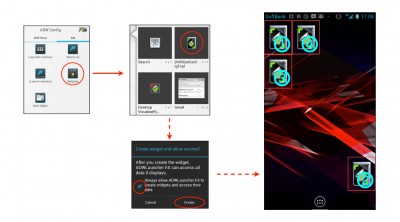
To put widget, long press your homescreen, then select “Add” > “Widgets” in the appeared “ADW Config” dialog and select “DVRSizeConfigTool”. If you see “Create widget and allow access?” dialog, check “Always…” and tap “Create”.
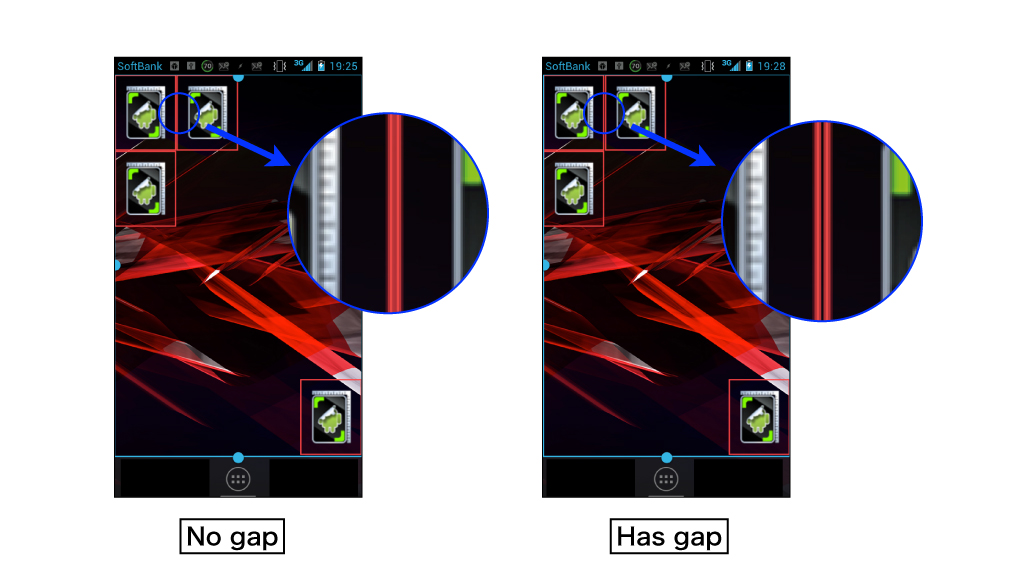
ConfigSlicerAdw02

Resize screens

Next, select “Resize screens” from ADW Config and drag the outline to perfectly fit the widgets.
You may see gaps between widgets. It’s because of rounding error of widget size. When you see these gaps, stretch or shorten the screen size.

ConfigSlicerAdw03

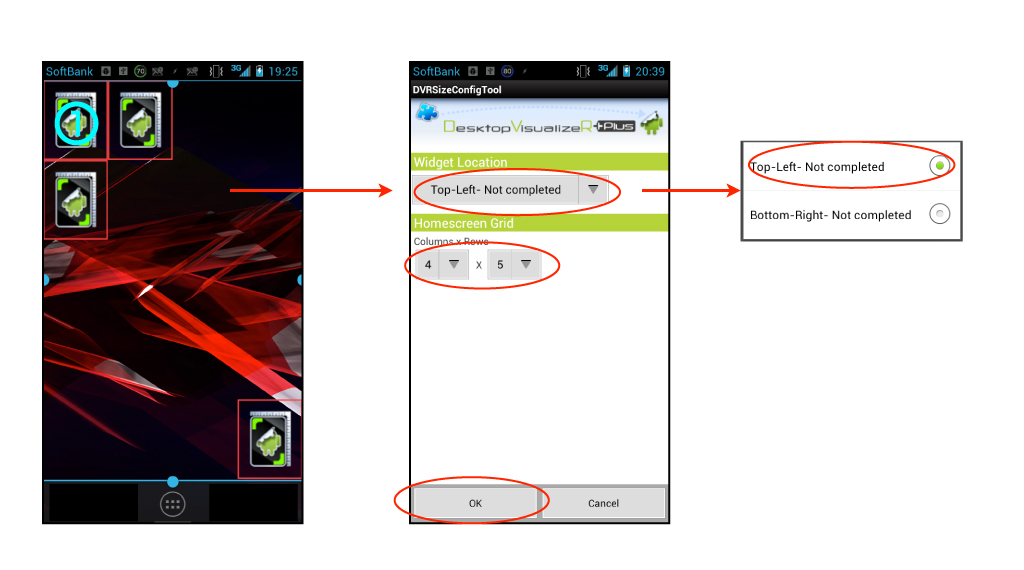
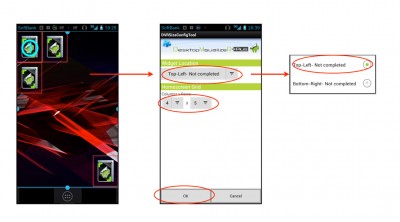
Run DVRSizeConfig(1)

Next, tap the left-top (1) widget to run DVRSizeConfig. Set “Top-Left” to widget location, homescreen grid and tap OK.

ConfigSlicerAdw04

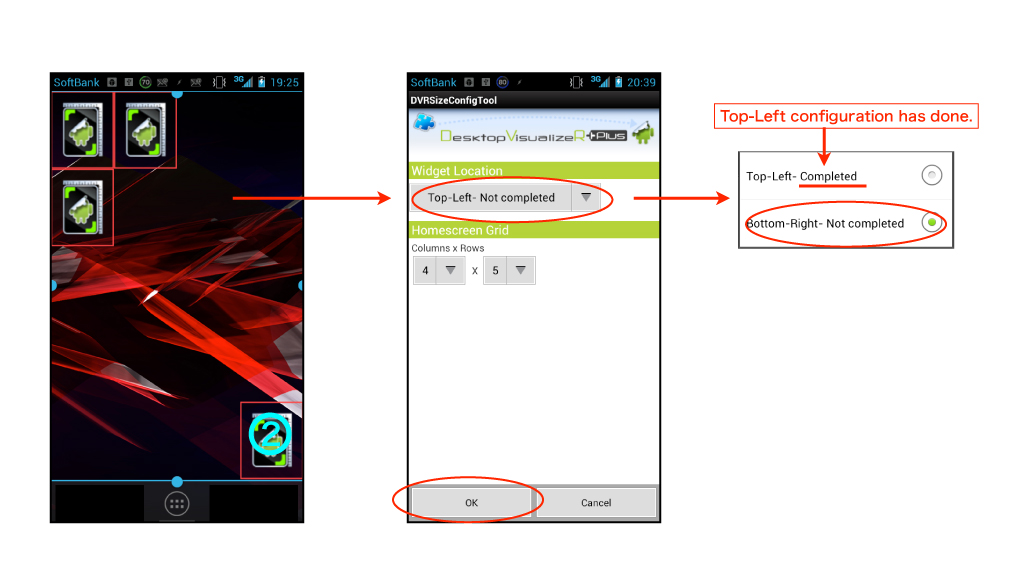
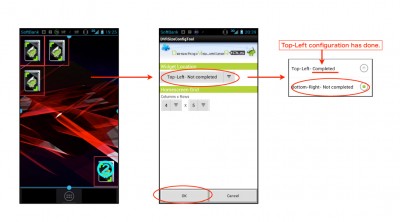
Run DVRSizeConfig(2)

Next, tap the bottom-right (2) widget to run DVRSizeConfig. Set “Bottom-Right” to widget location and tap OK.

ConfigSlicerAdw05

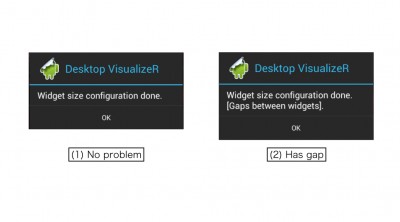
Run DVRSizeConfig(3)

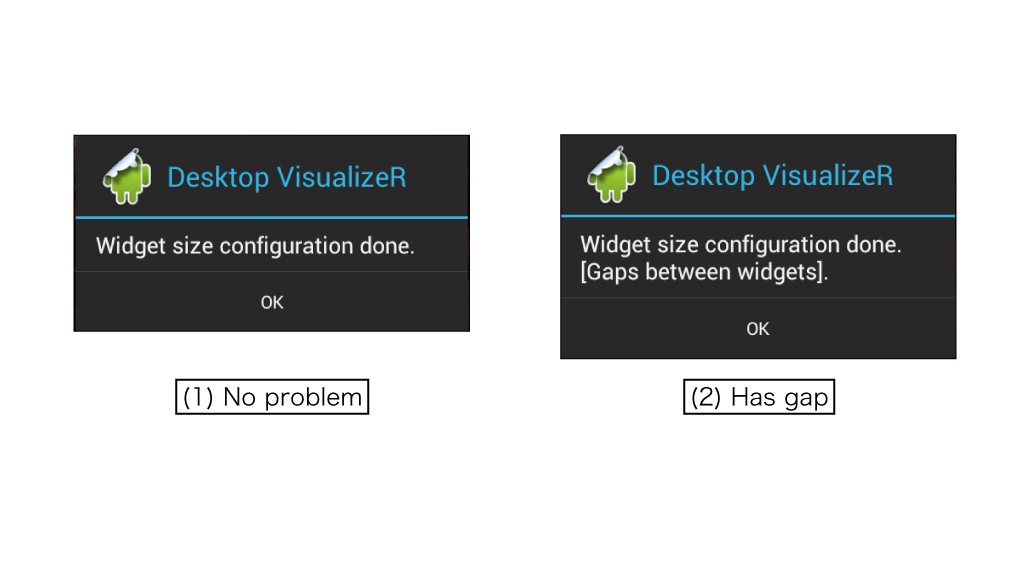
When you complete both Top-Left and Bottom-Right, DVRSizeConfig sends these size information to Desktop VisualizeR and delete its configuration. Desktop VisualizeR shows the result. When no problem has been found, it shows “Widget size configuration done.” dialog(1). If it shows “Gaps between widgets”(2), please go back to “Resize screens” and try again.

ConfigSlicerAdw06

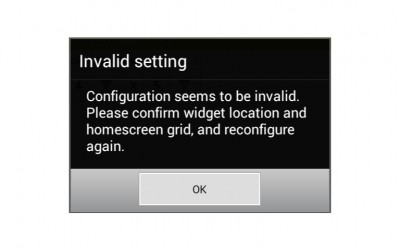
Trouble shoot running DVRSizeConfig

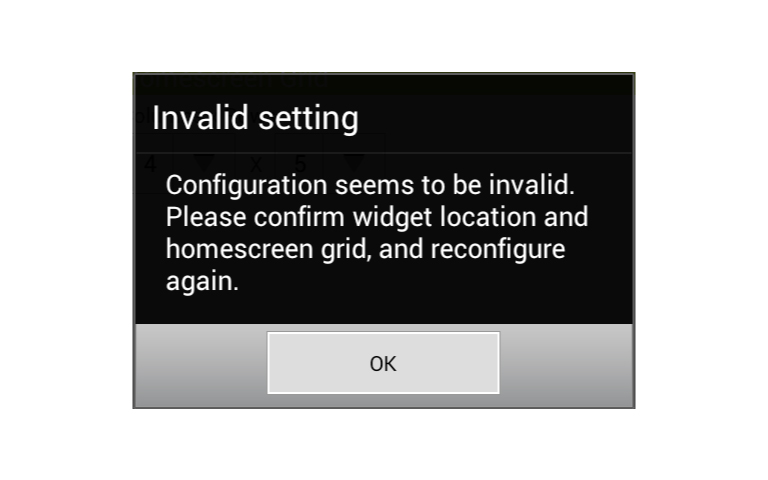
You may see “Invalid setting” dialog when you tap OK. It is shown when DVRSizeConfig cannot determine widget size. For example, when you configure Top-Left and Bottom-Right with the same location, DVRSizeConfig cannot determine widget size. If you counter this result, you should reconfigure already completed location again.

ConfigSlicerAdw07